This post contains affiliate links. I will earn a small commission, at no extra cost to you, if you make a purchase through these links.
Air plants are deceptively easy to care for. They look so cool—like the kind of plant that only hardcore plant owners are capable of caring for—but they’re actually very simple! In this post, I’ll review everything you need to know about Tillandsia care.
I’ll be focusing on Tillandsia xerographica, however, you’ll find that most air plants require similar care.
Air plants are epiphytes, or plants that grow attached to a surface (like a tree branch) and take their nutrients from the air, rather than the soil (hence, “air plant”).
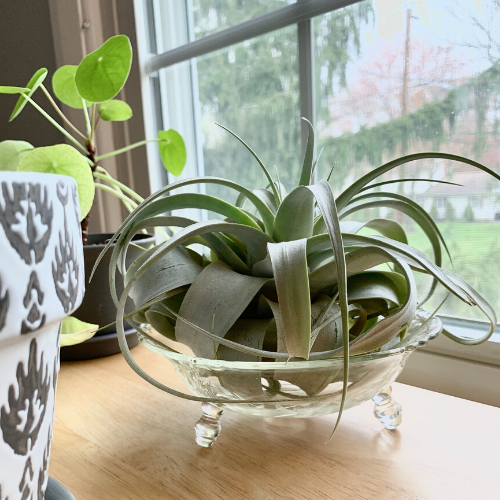
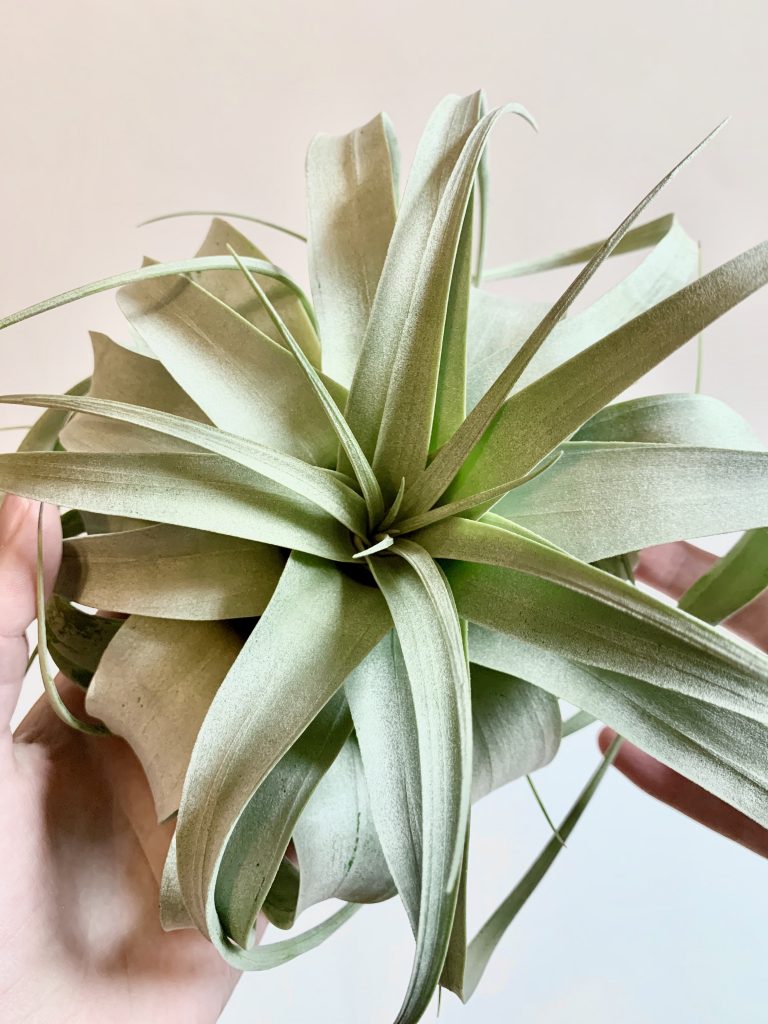
It’s hard to describe what an air plant looks like to someone who has never seen one. I think Tillandsia xerographica can be described as looking like a clump of light green/silver curled ribbons coming out from a center ball.
Depending on how large the plant is, those “ribbons” can remain tight or cascade down from the center.
Tillandsia xerographica is native to parts of Central and South America. You’ll typically find them clinging to high-up tree branches.
With proper care, these air plants can live to around 20 years and grow up to three feet wide. They can also produce a center bloom in the form of a yellow and red spike.
Where Can I Find Air Plants?
You can easily find air plants on Etsy. Check out this beautiful Tillandsia xerographica plant from one of my favorite Etsy sellers!
Caring for Tillandsia Xerographica
Now, let’s get into the nitty-gritty of tillandsia care and why they’re the perfect plants for everyone!
Soil
You guessed it—none needed. As I mentioned earlier, this is because they take their nutrients from the air. So, if there’s no soil, how do you plant an air plant? Well, you don’t have to do any planting which is one of the reasons why Tillandsia care is so easy!
Display
Instead of planting, there are many beautiful display methods for air plants. I have my large one sitting in a crystal dish and two smaller Tillandsias in a little crystal vase.
In the wild, air plants’ roots will keep them attached to a tree branch or rock, but some people like to use a small dab of glue to create their own nature-inspired air plant displays. But, be very careful if you decide to use glue on your plants and please check out some tutorials first!
You can also purchase air plant display kits that have what you need to make a fun and beautiful DIY display!
Light
Tillandsia xerographica does best in bright, indirect light. Too much direct light will cause crispy or burnt edges. For a guide on determining the natural light levels in your home, take a look at my easy guide to natural light.
What makes Tillandsia care super easy is if you’re stuck with a complete lack of natural light, these plants do well under artificial light (they make great office plants for this reason).
I have used/am currently using a few different sets of grow lights, but these grow lights are definitely my favorite. They’re really convenient to clip onto anywhere and reposition exactly how you need them!
(And for even more grow light help, check out my guide to grow lights!)

Water
When it comes to Tillandsia care, watering could not be any easier.
About once a week, soak your air plant in room-temperature water. If it’s summer or if you live in a hotter climate, increase that to twice a week. You can soak your plant in a filled-up bathroom sink or a bowl of water.
I give mine a good hour-long soaking, making sure all of the leaves are submerged and flipping over the plant if I need to.
It’s important that you don’t make the mistake of only watering the roots. Air plant leaves are covered in trichomes, which help the plant absorb moisture and minerals and regulate temperature.
This is precisely why you want to water them by letting the whole plant soak in water—so the leaves are actually what’s receiving the watering.
Since air plants have lots of nooks and crannies for water to get stuck in, it’s important to prevent any rot by gently shaking out your plant after it’s watered.
Some people mist their air plants instead of soaking them. In my experience, this isn’t thorough enough for my plants.
Fertilizer
It’s not necessary to fertilize Tillandsias but if you’d like to do so, use an air plant fertilizer or a bromeliad fertilizer. Make sure to read the instructions on the label on how often to fertilize your plants.
Propagation
The best way to propagate air plants is by separating the pups (baby plants). Pups typically appear after the mother plant’s blooming cycle.
Tillandsia xerographica has a very slow blooming cycle and might not produce its first bloom for years, so the chance of getting pups is rarer.
If your plant has a pup, wait until it’s about a fourth of the size of the mother plant. Then, use a clean, sharp knife to separate the pup from the mother plant.
But honesty, most of the time, Tillandsias are not plants that can be propagated often, and the easiest way to get more is to just purchase more!
Air Plant Shop has an excellent post with more information on propagating air plants.
Additional Information
Is Tillandsia xerographica toxic to pets?
Tillandsia xerographica is non-toxic to cats and dogs. However, it’s best practice to just keep all your plants out of your furry friends’ reach.
Add this cool air plant to your collection—get it here!
Raederle Phoenix says
Hi there.
I bought a large box of air plants including three xerographica about a month ago. I read that air plants like rainwater, so I’ve been using rainwater from our rainwater collection system for my plants by filling my bathtub every 9 to 10 days and dunking them. This morning is my third time giving them all a dunk, and I noticed one of my xerographica has reddish/brownish areas on the center of leaves. The other two xerographica seem healthy, and they’ve all been watered and dried together.
One possibility is that I picked up my air plant while I had oil on my hands. Could this harm the plant? (I regularly moisturize my hands with almond or jojoba oil.) I suspected oil as a possibility because when I dunked it, it had little spots that seemed like oil spots which I was able to rub away in the water. The only thing is that these spots weren’t possibly created by my touching it. It looked more like it had been spritzed with oil, which isn’t something that seems possible in the location I’ve been keeping it (fairly high up in a corner of a room).
The other possibility would be light. I have most of my plants on glass shelves *above* my windows. This means they get virtually no direct light at all, but indirect light all day long. I’m unsure how it compares to being 4 feet from a window at a lower location. They’re about 1 foot from the window, but above is very different than below (because of the angle of the sunrays).
The one xerographica that shows some browning has been located on a lower shelf further away from my windows, about three feet from the window, but still near the top of the window height. It’s been very cloudy, so I doubt it received direct sunlight during this time.
Interestingly, my one other air plant that is looking ill was in a nearby location. That’s my Spanish Moss. In the case with the moss it seems that the part of the plant that was on the underside is unhealthy and I suspect it wasn’t dry enough when I put it on the shelf. Either that, or the bottom side just hasn’t been getting enough light.
The last factor that maybe could be affecting my unhappy xerographica is my humidifier. It runs on a timer for only 15 minutes at a time, hours apart. I have it on the glass shelf above my western window and many air plants are near it. I figured they’d like that since it doesn’t get them wet really, but it does make the air moist. All the plants around the humidifier look as healthy as when they arrived, so I would think it’s a problem, except that this xerographica is the xerographica closest to the humidifiers line of mist (many of the air plants are much closer than any of the xerographicas).
After writing this all out I thought I might have a clearer idea what’s the matter. But I don’t. 🙁
Help?
Julie says
Hi Raederle – To answer your first question about the oil, unless you are heavily moisturizing your hands and then immediately picking up your plants and handling them for while on a regular basis, I’m not sure, it seems unlikely this could be the cause, but why not change up your moisturizing and plant-handling routine and see what happens? 🙂
Air plants don’t necessarily need a lot of humidity to thrive so that may or may not be the problem. If it’s really close to a humidifier and having problems, I would move it away from the humidifier and see what happens.
Last, it sounds like the plant could not be getting enough light so I would try moving it closer to a light source.