This post contains affiliate links. I will earn a small commission, at no extra cost to you, if you make a purchase through these links.
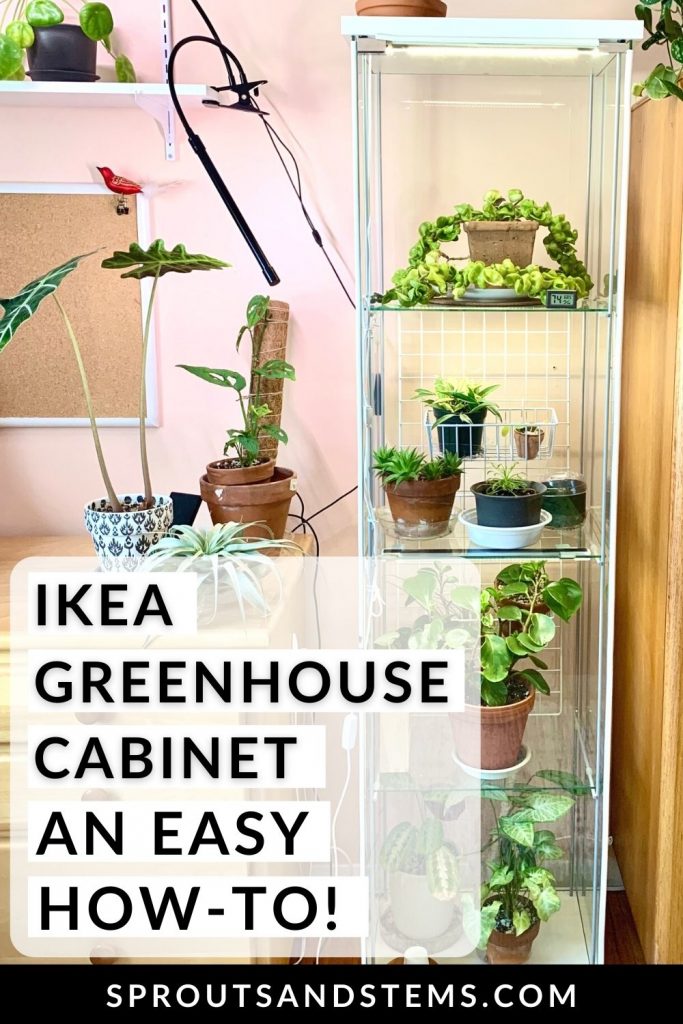
The Ikea greenhouse cabinet hack is what houseplant owners are doing to turn a regular cabinet into a greenhouse for their plants. In this post, you’ll learn exactly how I easily put together my Ikea greenhouse cabinet so that you can create your own cabinet.
I did not use any power tools or make any complicated modifications, yet I have found this greenhouse cabinet to be very effective for the growth and overall happiness of my plants.
Supplies I used to create my Ikea greenhouse cabinet
I’m going to go over each of these in-depth throughout this post but here is a quick list of the supplies I used for reference:
- Grow lights
- Wire racks
- Wire baskets
- Weather stripping
- Humidity and temperature meter (in Fahrenheit)
- Zip ties
- Twist ties
- Furniture-moving rollers
- Detolf cabinet from Ikea
Supplies not in my cabinet but used in other cabinets
Here are a few other items that I did not use in my cabinet but I have seen in others:
- Humidity and temperature meter
- This is simply a nicer meter than the one I used. If you want to ensure accurate temperature and humidity control, you should consider investing in a little bit nicer of a meter!
- Mini fans
- In a sealed environment, airflow is important. For now, I just open the cabinet for a little every day or two and so far it’s fine. If airflow becomes an issue I will definitely be adding fans.
- Mini humidifier
- You can also use a humidifier in your Ikea greenhouse cabinet for even more humidity.
- Smart plugs
- You can use smart plugs for your lights, fans, and humidifiers. Put your electronics on a timer, control them from your smart device, and even control them while you’re not at home.
- Cable management box
- Hides a mess of wires and also helps prevent people from tripping!
How do you put the cabinet together?
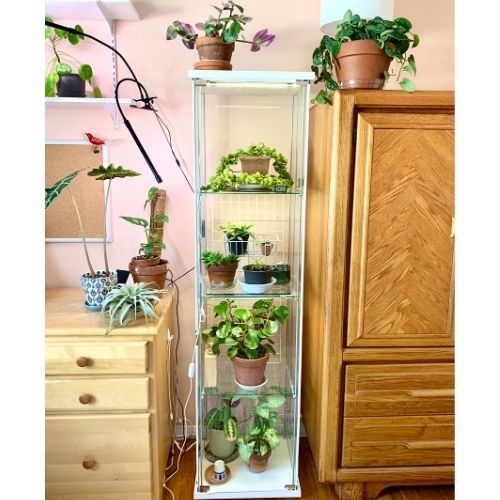
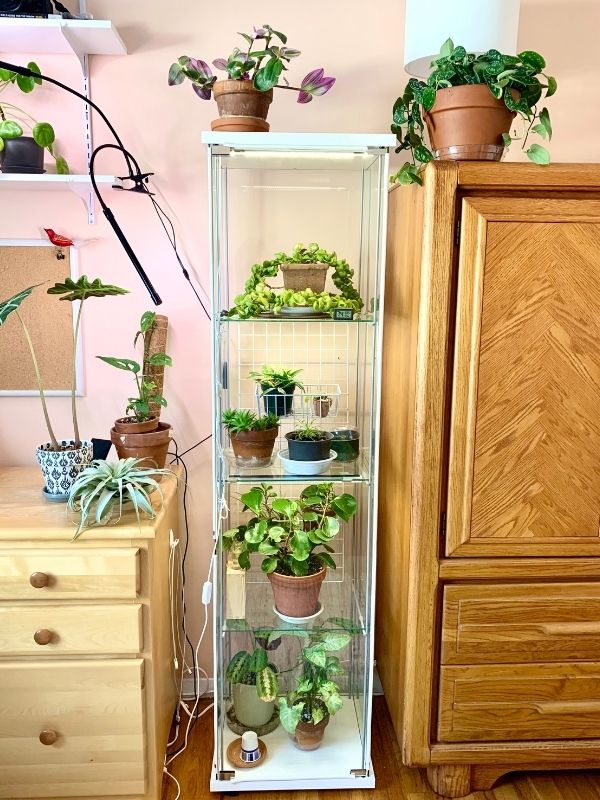
There are four large panes of heavy glass that make up my cabinet (I went with the Detolf model), so putting it together was a two-person job.
Make sure you put it together close to its permanent spot because it’s not easy to move without furniture rollers!
Aside from it being heavy, assembling the cabinet is not difficult. Ikea provides easy instructions and all the pieces you’ll need. The only additional tool I needed was a Phillips-head screwdriver, which Ikea tells you in the instruction pamphlet.
How do you turn the cabinet into a greenhouse?
Grow lights
I went with these grow light strips. They are full-spectrum, LED grow lights.
The lights have a timer which is a nice feature. All three lights are attached to one wire, which I was worried about, but after installing them there was a lot of extra wire so that wasn’t an issue.
I used twist ties to secure the extra wire to the metal frame and keep it out of the way.
You can adjust the dimness and also decide if you want to have all three, two, or just one light one on. You cannot adjust the dimness on each individual light, though.
The lights come with sticky tape so they can be attached to a surface.
For the most part, the sticky tape was pretty secure, except one side of one of the lights did come unstuck after just over a week. Although the rest of the stickiness was fine, I duct-taped all of the lights to the shelves just to be safe.
Aside from that one incident, I am very happy with these lights for my Ikea greenhouse cabinet and so are my plants.
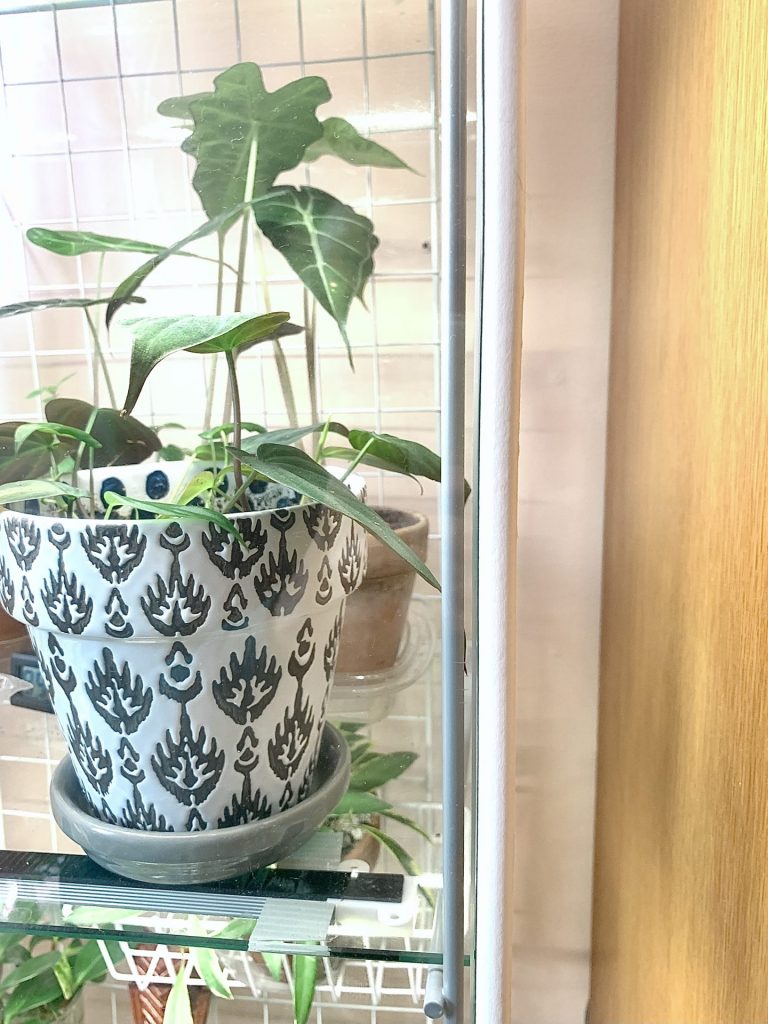
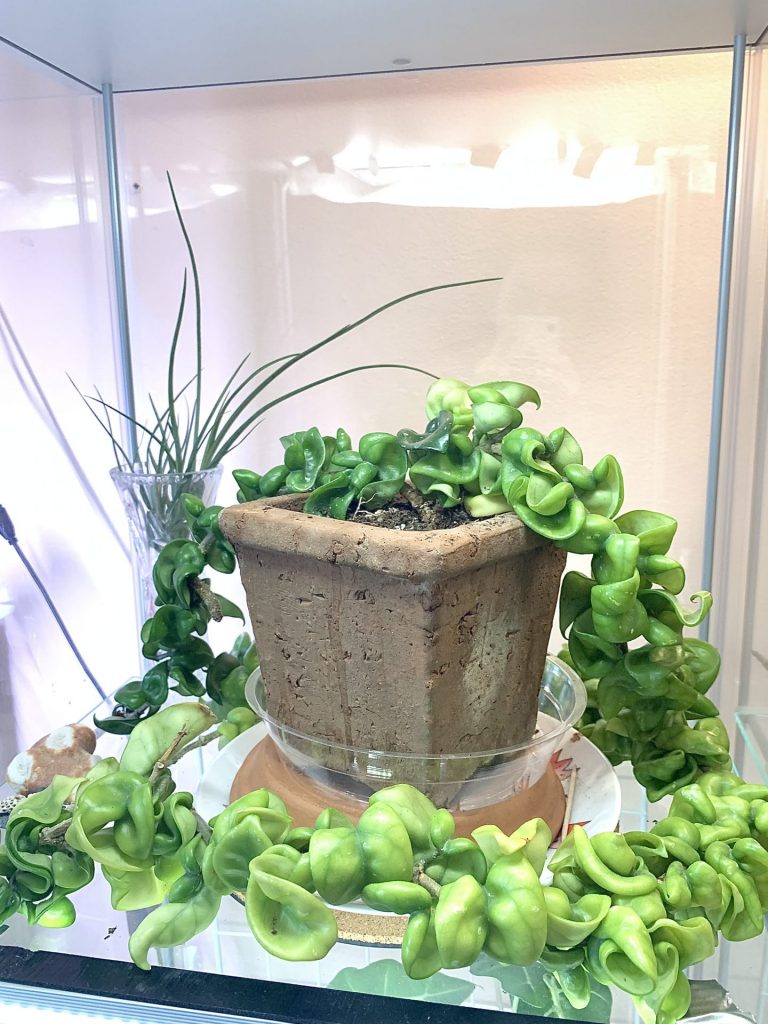
The grow light was a little too bright for Hoya carnosa compacta, so I decided to tape a sheer piece of fabric I had lying around over the light. I mean, it’s not the cutest, but it works! You can see this in the above image.
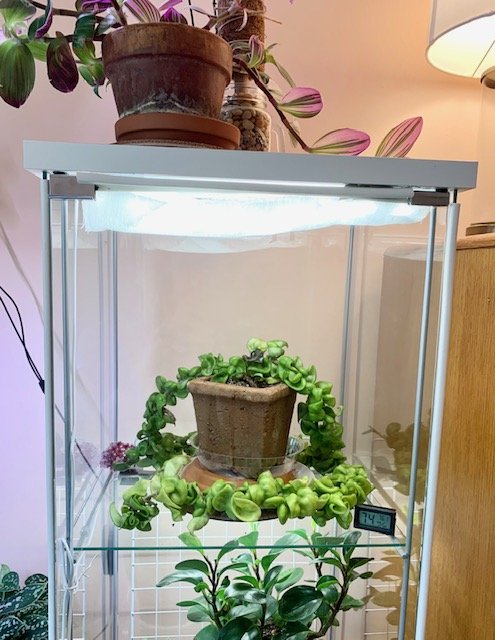
Since there are three shelves in the cabinet, plus the floor, the floor part doesn’t have a light directly overhead. A few low-light plants live down there.
I did not have to drill any holes in the cabinet for the grow light wire. I was able to have the wire coming out of the door and still have the door stay closed because there is a magnet that helps it stay shut.
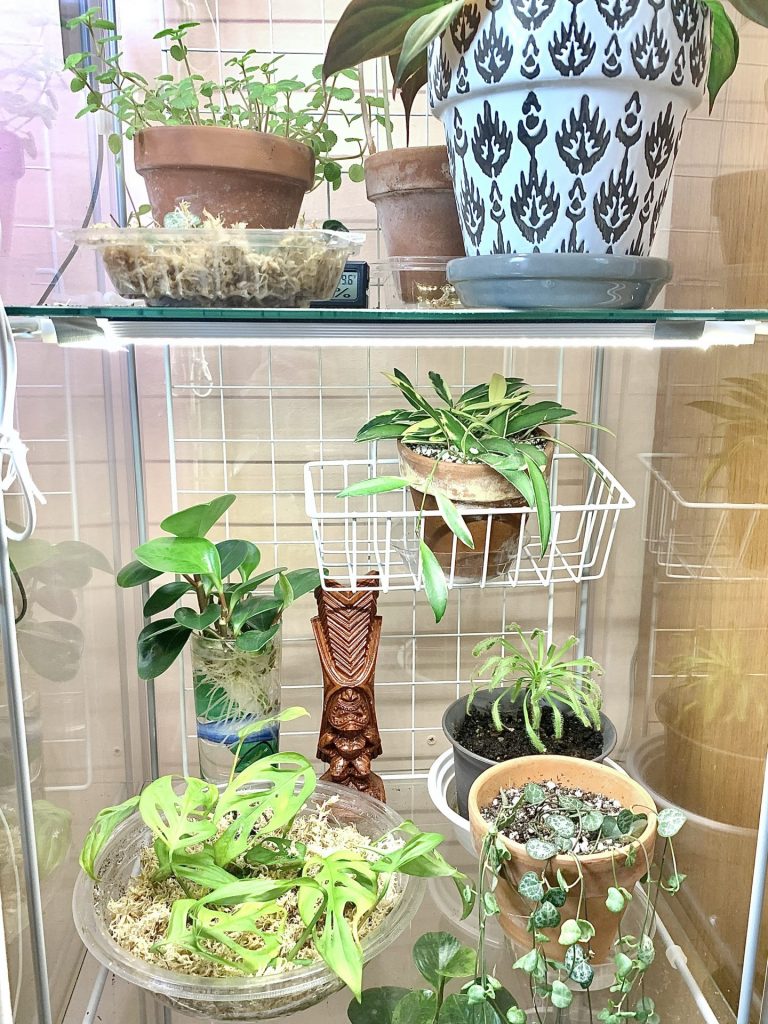
Wire racks
I wasn’t sure if I’d use these wire racks at first but they’re really coming in handy for making the most out of the space! They also come with clothespins, clips, and hooks, which I’m sure I’ll find a use for at some point.
I have the racks zip tied at the top corners to the metal frame of the cabinet. They still aren’t totally secure, I just have the bottom of the racks resting on the shelf. But, if for some reason the rack did slip off the back of the shelf, the zip ties would prevent it from crashing to the floor.
Wire baskets
I got these wire baskets to hang onto the wire racks.
The racks are four inches wide and can fit a few small pots.
I’ve also thought about adding some sphagnum moss directly into the wire baskets and using them as a little propagation station. I think that would look pretty cool!
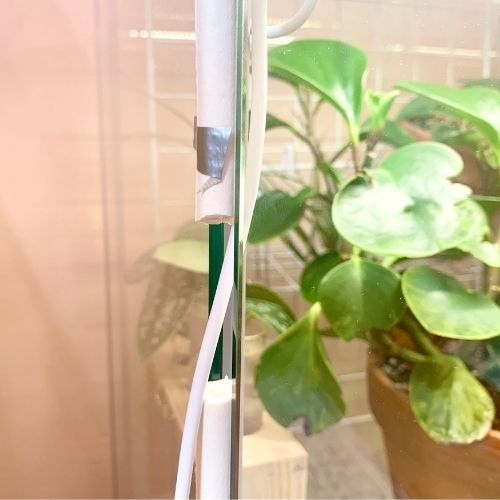
Weather stripping
Weather stripping is what you really need to turn your cabinet into an actual greenhouse. It will seal the cabinet and help control humidity and temperature.
With the Detolf, there is a slight gap all around the entire front door, and the wire from the grow lights made the gap slightly larger. To help with this gap, I added weather stripping.
After weatherstripping my Ikea greenhouse cabinet, there were still some gaps around the corners and for the grow light wire.
However, adding this has still made a huge humidity difference. It was not hard to do, so I do recommend weatherstripping your cabinet.
The one thing I’ll mention with this is that it’s not permanent and can easily peel off. On one hand, that’s a good thing, BUT it was starting to peel off in a few places right after I applied it.
I’m not sure if this was because it was watering day and I kept opening and closing the cabinet immediately after installing the strips, not allowing them to settle in, or if it would have done this anyway.
I simply placed a few small pieces of tape in the three spots where this was an issue and the problem was solved.
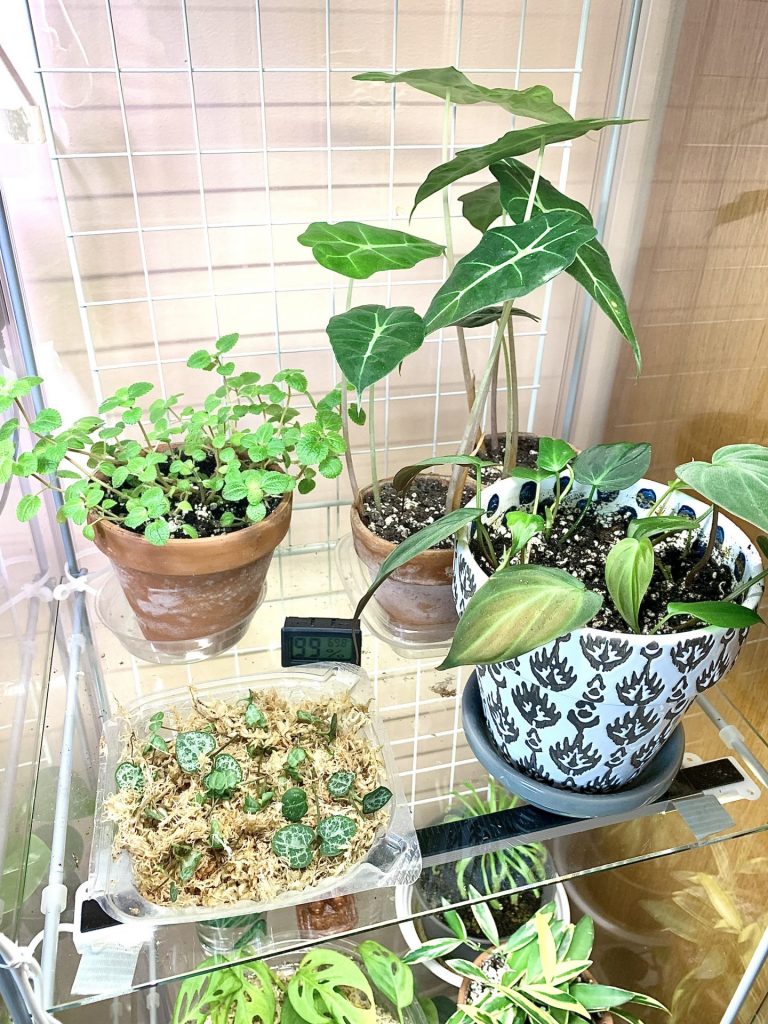
Humidity and temperature meter
This little humidity and temperature meter (Celcius version here) sits on the top shelf and lets me know the weather stripping is working!
The humidity is nearly always above 90% in the cabinet (without a humidifier!).
I am using a cheaper meter and it works fine for what I need it to do.
If you want to ensure your humidity and temperature are extremely accurately controlled, you’ll want to invest in a more accurate meter, like this one. You might consider this if you collect rare plants.
What kind of cabinet should you use?
You can use ANY cabinet, not just one from Ikea! Even if the walls are not see-through, it won’t matter once you add grow lights.
Whichever one you choose it should have a door that closes shut if you want to take advantage of the humidity that a real greenhouse provides.
If you’ve decided to go with an Ikea cabinet, there are a few different models in their “Display Cabinet” section. The ones that are most often used for greenhouse cabinets are:
- Detolf
- Milsbo
- Fabrikor
- Klingsbo
- Rudsta
I’m using the Detolf. The price is the cheapest at the moment and perfect for anyone who wants a greenhouse cabinet without it being a big investment.
Personally, I also liked how the Detolf looked more than all the other options. It is glass all around and more clean and sleek rather than industrial looking.
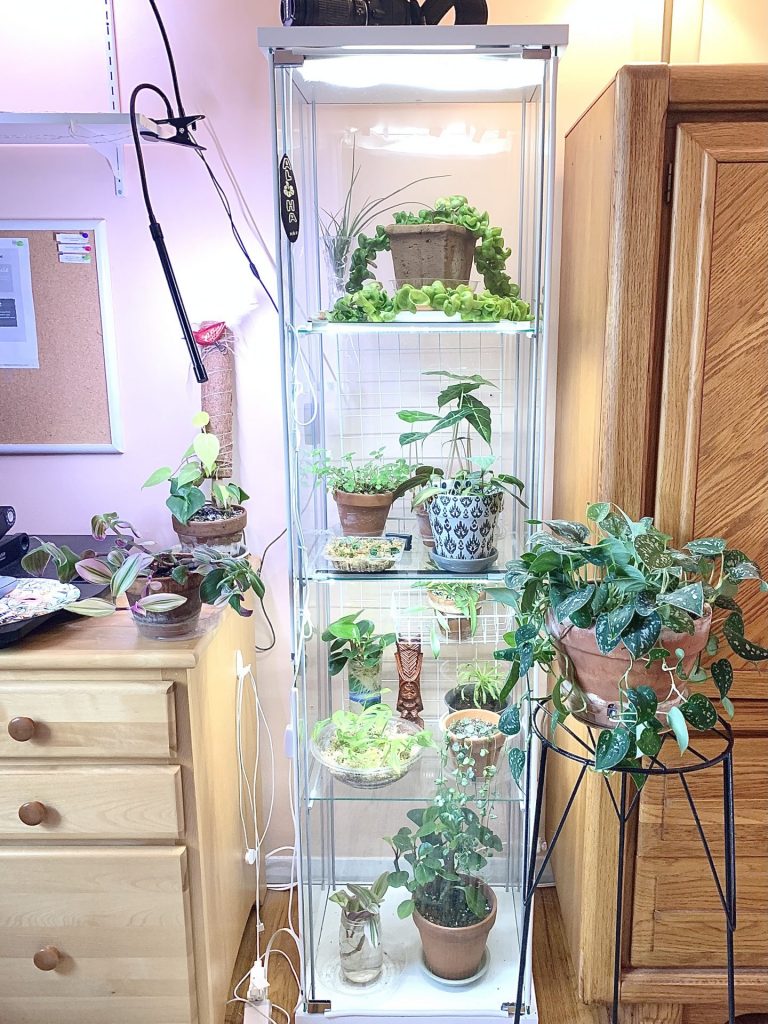
It’s a great size and will fit in smaller rooms—all you really need is a spare corner! It fits more plants than I thought it would and I still have space to pack in some smaller plants and cuttings.
Here is the Detolf sizing from Ikea’s website:
- Width – 16 3/4 inches
- Depth – 14 3/8 inches
- Height – 64 1/8 inches
- Max load/shelf – 8 lbs
The shelves of this cabinet are removable—they just rest on the metal frame—so if you are concerned about taller plants, you can still use the Detolf.
The cabinet is pretty sturdy and you can also use the top of the cabinet as more plant space.
What is an Ikea greenhouse cabinet?
The Ikea greenhouse cabinet hack is a way of taking a cabinet and modifying it to create a mini greenhouse.
It does not actually have to be an Ikea cabinet, but Ikea has some great options at decent prices which is why a lot of people use their cabinets.
People are creating these cabinets for a few reasons:
- It provides a controlled environment. Controlled temperature and humidity are very beneficial for certain houseplants, and even essential for some rare plants.
- It creates vertical space—an excellent solution if you don’t have a lot of space for plants.
- It’s also a great solution if you don’t have a lot of natural light. Although, if you do have natural light you can still have a cabinet and skip adding grow lights.
- It’s a great solution for keeping curious pets away from plants.
- It looks really beautiful! I consider my cabinet part of the decor in the room.
Cabinet maintenance
There is not much I need to do in terms of maintaining my Ikea greenhouse cabinet, just a few things:
- A wipe down of the cabinet when necessary, but I remove my plants to water them so the shelves don’t get that dirty. When I do have to clean shelves, it is easy because they are removable.
- I use the nozzle of the vacuum cleaner occasionally. For example, I recently dropped a container of cuttings I was propagating and the soil spilled throughout the whole cabinet (oops). Cleanup was easy with the vacuum nozzle.
- Since I don’t have fans, I open the cabinet once every few days let in some fresh air. There is a bit of a scent, but it’s not a bad scent. Just an earthy scent.
- I check for pests regularly. Ideally, you should be doing this anyway, with or without a greenhouse cabinet!
What kind of plants should you put in the cabinet?
At the end of the day, you can really put any plant you want in the cabinet! If you’ve weatherstripped it, then your high-humidity plants will do very well in there. I have one succulent in there at the moment and it doesn’t seem to mind the humidity.
If you’ve added grow lights, then your bright-light-loving plants will also do well.
Many people with greenhouse cabinets use them for their rare plants since the environment inside can be controlled exactly to the plants’ needs. If you’re a rare plant collector, I highly recommend a greenhouse cabinet.
How are my plants doing in the cabinet?
There is no doubt that my plants love the environment inside my Ikea greenhouse cabinet!
Some examples of progress I’ve seen include:
- My cape sundew has started eating. Admittedly, I’m new to carnivorous plants and don’t know much about them, but I DO know my sundew did not start actually eating its food until I put it in the cabinet.
- Peperomia obtusifolia has new growth.
- Small Hoya (not the Compacta) has new leaf growth after doing literally nothing for six months.
- Various propagated cuttings as well as Alocasia corms have done and are doing better in the humidity and brighter light.
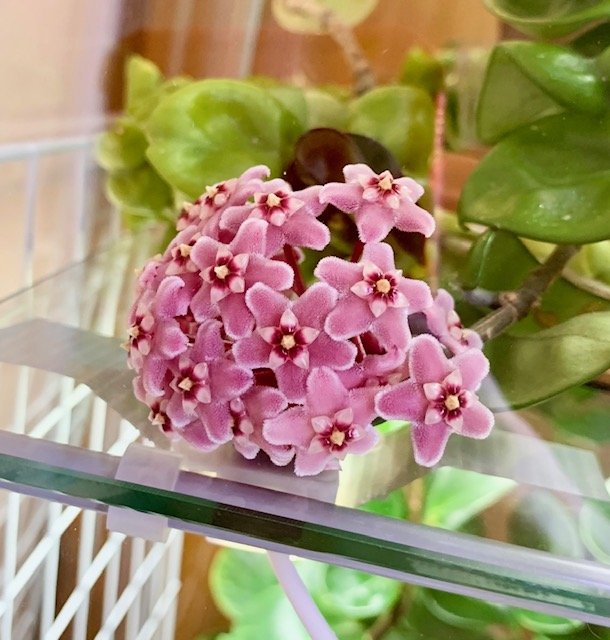
- Hoya Compacta has flowered multiple times (for the first time in my care).
- All around faster growth for most of my plants.
Heather Crough says
Awesome! Your plants look healthy and happy in you cabinet greenhouse!
Julie - Houseplant Aficionado says
Thanks, Heather!
Valda says
Great and full information. Thanks so much.
Hercules Romeu says
Looks great! But could you maybe tell us or break it down how much it cost to make one?
Julie - Houseplant Aficionado says
Hey Hercules – Glad you liked it! Creating my cabinet cost me around $190 (with the cabinet itself being the most expensive item). Prices of the items I’ve linked to slightly change periodically, but you can find the current price for each item at the links 🙂
Virginia says
I was thinking this might work well for seed starting.
Julie - Houseplant Aficionado says
My props and cuttings love it so I’m sure it would be great for seedlings as well!
Priscilla says
What a great article. Thank you for sharing. It is informative and easy to understand.
Julie - Houseplant Aficionado says
Thank you so much! So glad you enjoyed it 🙂
Roy says
Are the feet of this cabinet able to make adjustments (screw in or out) to compensate for un even floors?
Julie - Houseplant Aficionado says
Hi Roy – Unfortunately, I don’t think you can adjust the feet.
Cristina says
Are you still finding everything going well without the fans? I installed mine last week ago and just open it daily for 10 minutes so wondering if you ever broke down and just bought the fans.
Julie, Houseplant Expert says
Haha, I never broke down! Still not using fans and I also don’t open the cabinet as often as I did when I first put it together. Probably just two to three days a week when I’m watering!