This post contains affiliate links. I will earn a small commission, at no extra cost to you, if you make a purchase through these links.
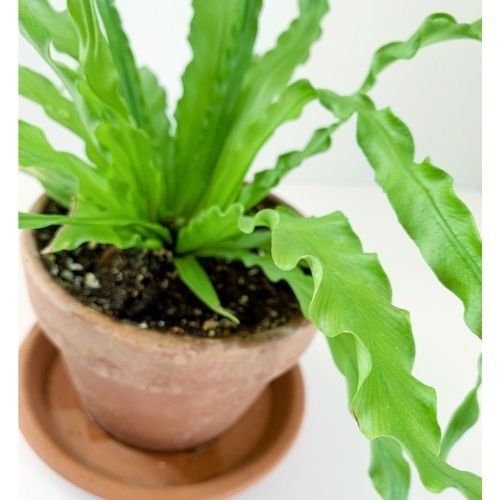
This Bird’s Nest Fern, also known as the Crispy Wave Fern, is an epiphytic plant known for its wavy, whimsical fronds.
Epiphytic, meaning it grows on the surface of another plant rather than out of the ground, like nestled into a tree trunk.
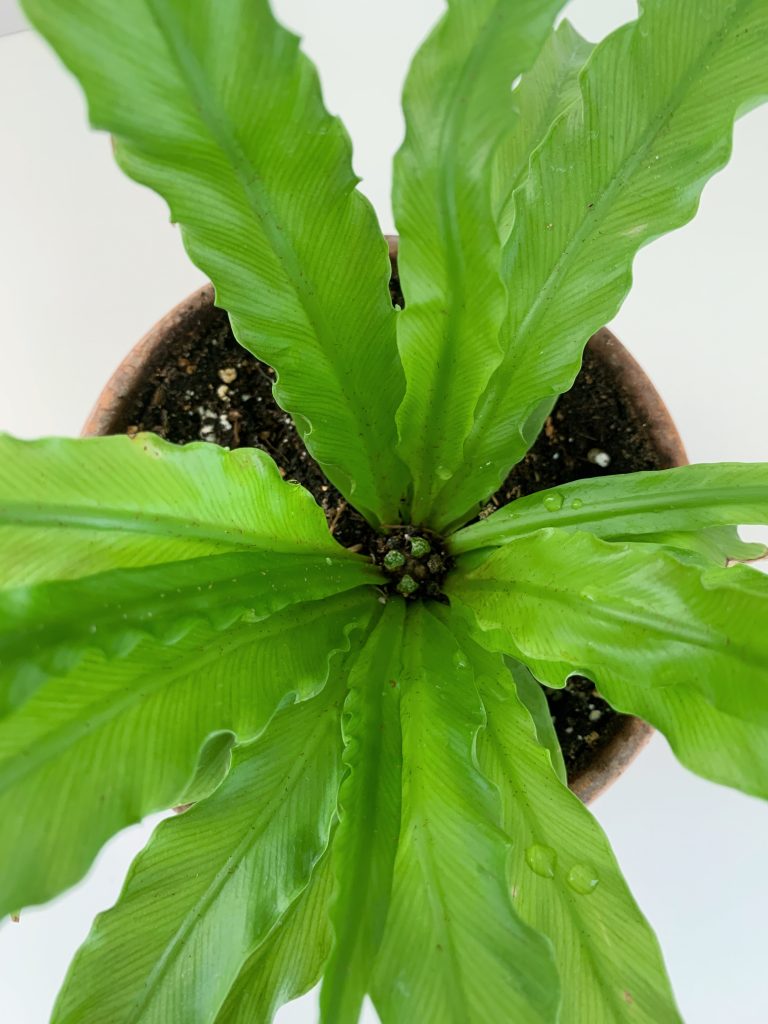
The Bird’s Nest Fern gets its name from the center of the plant where the new fronds unfurl from. The center almost looks like a nest cradling little birds—the fronds that are about to unfurl.
The Bird’s Nest Fern is native to tropical regions including parts of Asia, Australia, Hawaii, Polynesia, India, and Africa.
Where can I buy a Bird’s Nest Fern?
You can easily find a Bird’s Nest Fern on Etsy. Check out this gorgeous Bird’s Nest Fern from one of my favorite Etsy shops!
Bird’s Nest Fern Care
Ferns have a bit of a learning curve but they are definitely worth it. Especially the Bird’s Nest Fern—a conversation starter of a plant! Let’s learn about Bird’s Nest Fern care below:
How much sun does a Bird’s Nest Fern need?
The easy part of Bird’s Nest Fern care is that ferns, in general, do not need lots of bright light to grow. Bird’s Nest Ferns prefer filtered light or indirect light.
Filtered light means any light would be “filtered” by something before hitting your plant, like a sheer curtain.
They definitely will not do well sitting in direct light. For this reason, ferns make great low-light plants!
Check out my guide to natural light for indoor plants if you’re unsure about the natural light in your home, and my guide to grow lights for indoor plants if your plants need more light. (My two favorite grow lights are below.)
(If you can’t see the images, click here to get my fave clip-on goose-neck grow lights and here for my fave stick-on grow light strips!)
How often should I water my Bird’s Nest Fern?
The question isn’t so much how often, but how do you know when to water your Bird’s Nest Fern. Water when you feel the top inch or so of the potting mix is dry.
Ferns like to remain moist, but not wet. I repeat, not wet! Don’t let the fern dry out completely, but don’t keep it too soggy either or you could put your plant at risk of root rot.
Try not to water in the center of the plant where the new leaves unfurl from. I can tell you first hand that this will cause the center to rot.
If you do get water in the center, not to worry, just dab it dry with a paper towel.
Should I mist my Bird’s Nest Fern?
Bird’s Nest Ferns like humidity. You can mist the plant a few times a week to help them with this. Just make sure your fern is not constantly soaking wet.
I wrote about more easy ways to create humidity for your houseplants in addition to misting, check that out for more help!
Potting Mix
Bird’s Nest Ferns are epiphytes and therefore don’t need to be tightly packed into their potting mix.
A mixture of peat moss (helps to hold moisture) and perlite or orchid bark (is loose and well draining) works well for this plant. However, any loose, well-draining indoor plant potting mix should also be fine.

Repotting
Generally, repot your Bird’s Nest Fern every two years in a pot that’s the next size up from its current pot and has drainage. It’s best to repot in the growing season (spring and summer).
Fertilizing
Bird’s Nest Ferns do not need much fertilizer and in fact, really do not like to be overfertilized. A balanced houseplant fertilizer, diluted to half strength, a few times throughout the growing season (spring and summer) is fine for this plant.
Pruning
You should not need to prune your fern except to remove any of the old, outermost leaves if they start to die.
Simply remove them with clean, sharp scissors or pruning shears, or wait for them to get to the point where you can just gently pull them off.
Mounting a Bird’s Nest Fern
Instead of potting up your fern, you might choose to mount it. Like many other ferns, Bird’s Nest Ferns are excellent candidates for mounting. Here’s how to mount a Bird’s Nest Fern.
Ferns are typically mounted onto a piece of preserved wood or a decorative piece of driftwood. It’s important that you use a piece of wood that is preserved so it will not rot.
You should also have some sphagnum moss, sheet moss (optional), and clear fishing line.
- Take some sphagnum moss, enough that it will act as a base for your plant, and place it down onto the piece of wood.
- Take your fern out of its pot and remove any large amounts of excess soil (leaving a little left is fine).
- Place the root ball of the fern on top of the moss and wood.
- Place more sphagnum moss around that to cradle the root ball.
- (OPTIONAL STEP) Wrap the sheet moss around the outside of the sphagnum moss-wrapped fern if you want a neater look.
- Use the fishing line to secure the fern and moss to the wood. Use as much as you need to make sure it’s tightly secured.
- Done! Now you’ll just need to find a spot to hang your mounted fern.
Alternatively, there are some pretty awesome mounting kits on Etsy, like these, that make it easy by giving you everything you need to mount your plant.
I’ve linked to the entire search results page instead of one single item because these seem to sell out quickly!
To water your mounted plant, simply take the whole thing down off the wall and submerge it in a large bucket, sink, tub, etc. for 15 minutes to a half hour. Then, hang it back up once you’ve let it dry out a little.
Bird’s Nest Fern Propagation
In general, ferns are not the easiest candidates for propagation, but it certainly can be done! Unfortunately, you cannot propagate a fern by cutting off a leaf and sticking it in water.
To propagate a Bird’s Nest Fern, you’ll need to use its spores, which you’ll find underneath its fronds.
To collect Bird’s Nest Fern spores, remove a mature frond and place it in a paper bag. After a few days, some of the spores should have fallen off the frond and into the bag.
Prepare a pot of moistened sphagnum moss, and place the spores on top of the moss.
Use the bottom-watering technique to keep the moss moist. This means you’ll place the pot in a dish of water and let it soak up whatever it needs through its drainage hole, instead of watering the top of the moss.
Let the pot soak until you feel the top of the moss is damp. You don’t want it sopping wet, but the spores should always remain moist.
Keep the spores in low or filtered light—do not put them in direct light.
Help lock in moisture by placing a clear plastic bag or plastic wrap around the top of the pot (remove it every few weeks for air flow). Alternatively, mist the spores regularly, but you’ll have to be more diligent with this.
In a few weeks to months, the spores should start to germinate and develop. For the fern to actually develop into a fern, that can sometimes take a year or even longer.
Additional Information
Are Bird’s Nest Ferns toxic to pets?
Bird’s Nest Ferns are not toxic to cats and dogs, however, it’s best practice to keep plants out of your furry friends’ reach anyway.
How big do Bird’s Nest Ferns get?
Under ideal conditions, Bird’s Nest Ferns are fast growers and can grow to be two to four feet tall.
For more on ferns, check out my guide to staghorn ferns.
Laura says
Thanks for the info on birdsnest ferns I wish I had seen it before I had 2 die on me. I am a new plant parent and l love taking care of my plants