This post contains affiliate links. I will earn a small commission, at no extra cost to you, if you make a purchase through these links.
In this post, we’ll discuss propagation tips, common questions, and how to propagate five ridiculously easy plants so that you can get started creating new plants right away.
Why Should You Propagate Plants in the First Place?
- It hones your skills and allows you to learn more about plant growth and care firsthand.
- Everyone loves to talk about the “free plants” aspect of propagation…because it’s true! It’s an easy and free way to add new plants to your home.
- Not only is it great to grow free plants for yourself, but it’s also awesome to be able to give them away to friends and family. It always means a little more that you grew the plant yourself.
- It creates a “backup” of special plants. I am always propagating a prayer plant that I got from my grandfather’s house after he passed away because that’s one plant I NEVER want to lose. Propagation creates clones of your plants and is almost like an insurance policy.
- Propagating plants is a fun science experiment. It’s really cool to see roots begin to sprout and watch them grow every day.
Background Information
Some houseplants do better with water propagation while some do better with soil propagation. The easiest ways to propagate houseplants is by taking a cutting or by dividing the plant. Division basically means separating the roots of the baby plant from the mother plant and repotting them.
My Preferred Propagation Method
We’ll be talking about propagating cuttings in water in this post because I feel that it’s the easiest (and most exciting) method for beginners for a few reasons:
- It allows you to track your progress and understand whether or not something is working.
- Seeing the progress of the roots is cool.
- Water propagation is pretty. I love to use mismatched glass jars or crystal vases. Heck, you can even leave your plant to grow in water permanently if you want.
- Dividing and repotting a plant is, let’s be honest, not as exciting as water propagation.
- It buys you some time to find the perfect pot and get your potting medium together if you don’t already have those materials on hand, which I don’t always have if I decide to propagate a cutting on a whim.
How Long Do Plant Cuttings Take to Root?
It depends on your plant. With water propagation, you should be able to see roots sprouting on most plants within the first week to 10 days. With soil propagation, it’s a waiting game until you start to see new growth on the plant, which can take up to a few weeks.
I find that three to four inches is a good root length to be able to pot cuttings. Propagated in water, some plants might be ready to pot in as little as two weeks, while some will need up to a month or more. The key is patience, don’t get frustrated. Give your cutting enough time to adjust to its new situation.
Can You Propagate Any Plant?
Yes! Propagation is just the process of creating new plants. This could be through seed, through growing a cutting in water, or through any other method that creates new plants.
Materials Needed for Propagation
- Glass jars, containers, vases, etc. – any see-through container that can hold water
- Or, a propagation station, which comes in handy if you don’t have a lot of room for all those jars
- Clean plant shears or sharp scissors. It’s important that they’re clean to help prevent infection
After a few weeks, you’ll also need:
- A small pot with drainage that will fit your baby plant
- The potting medium that you’ll plant in
General Houseplant Propagation Tips
I have a few tips that I wanted to note beforehand so I don’t end up repeating them for each individual plant:
- When you can, take more than one cutting to increase your success rate. There will be times that you’ll fail, but it’s part of the process.
- Make your cut at a 45-degree angle. This increases the rooting surface area.
- Try not to propagate during the winter. Plants are not in the active growing stages during this time.
- You can use cinnamon or raw honey as a rooting hormone, which have anti-bacterial and anti-fungal properties. Dip the end of your cutting in the cinnamon or honey before putting it in the water. I don’t always do this, but definitely experiment if you want!
- To help your plant adjust better, once your cutting is ready to pot, add a small amount of potting mix into the jar of water each day until the water is nearly replaced with mix. Then, pot your plant in its permanent pot. Roots grown in water are different from roots grown in potting mix, and this will help transition the roots from being fully exposed to sunlight to receiving none at all. I don’t always do this either, but it’ll never hurt.
What Are the Easiest Plants to Propagate?
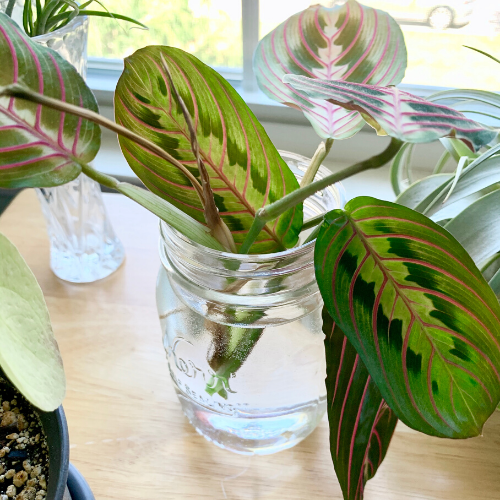
Prayer Plants
Prayer plants, or marantas, are all-around awesome plants. Check out my post on caring for them! They are very easy to propagate and I recommend beginners give this plant a try.
How to Propagate It
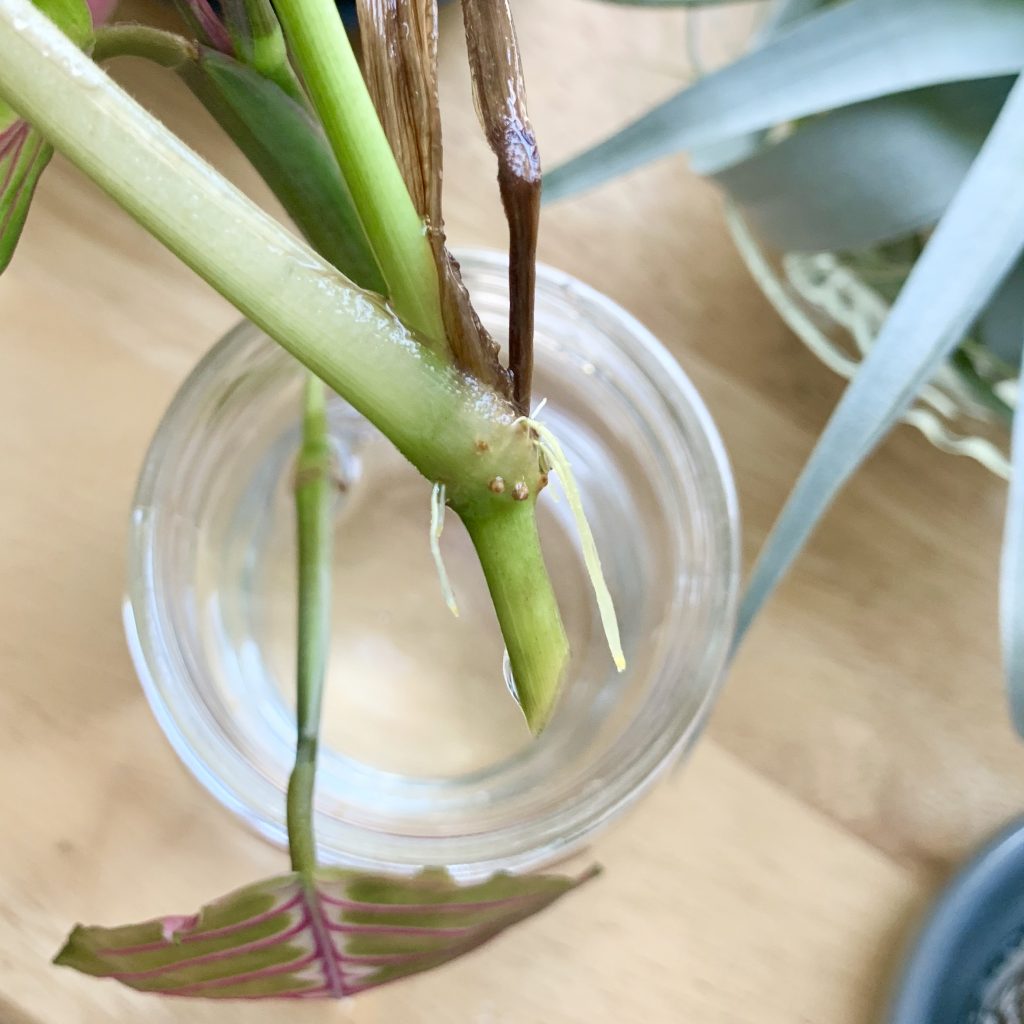
To propagate the prayer plant, cut off a piece that has a few leaves about a quarter-inch below a node. This is where the smaller stems of the individual leaves join the main stems, and where new roots will sprout when cut. Remove any lower leaves so that there are just a few at the top, creating a few inches of bare stem.
Put your cuttings in a jar of tepid water and put the jar somewhere that receives bright, indirect light. Within a few days, you should see tiny roots sprouting. Replace the water once a week or so, when it looks like it’s getting grimy, and top it off when the water level gets lower. Within a few weeks, your cuttings should have roots that are a couple of inches long and ready to transfer into their pots.
Spider Plants
I had to include spider plants. I would argue that they are THE easiest to propagate because they basically tell you, “Hey, cut this part right here!” Let me explain:
How to Propagate It
Spider plants grow babies, or little plantlets, from the ends of the mother plant’s runners. This is the part you want to take. It’s better if the baby plant already has some roots forming, you’ll have a higher success rate. Cut the baby away from the mother plant and remove any leaves growing around the bottom that would otherwise be submerged in water.

Put your cutting in a jar of tepid water. Try to keep the plantlet from completely falling in. You can use a skinny vase or rig some sort of system to do this. Sometimes I put a few rubber bands around the jar (so that they’re secured around the top and bottom part, not around the sides) which will give the plant something else to sit on. I’m currently doing this for my tradescantia cutting, see in the photo below for what I’m talking about:
Put the jar or vase somewhere that receives bright, indirect light. Within a few days, you should see tiny roots sprouting. Replace the water once a week or so, when it looks like it’s getting grimy, and top it off when the water level gets lower. Within a few weeks, your cuttings should be ready to transfer into their pots.
Pothos
Of course, I had to mention the pothos, everyone’s favorite propagatee (did I just create a new word there?). Pothos propagate ridiculously easily and they also grow well if permanently kept in water. Check out my post on caring for pothos.
How to Propagate It
Cut off a vine with a few leaves on it about a quarter-inch below a node (again, where the leaves meet the stem. Those little brown bumps you see along the stems are also called nodes).
Remove the first couple of leaves to leave about six inches of stem, and put the cutting in a jar of tepid water, making sure the nodes are under the surface. Place the jar somewhere that receives bright, indirect light.
Within a few days, you should see tiny roots sprouting. Replace the water once a week or so, when it looks like it’s getting grimy, and top it off when the water level gets lower. Within a few weeks, your cuttings should have roots that are a couple of inches long and ready to transfer into their pots.
Monsteras
The monstera is put on a high pedestal within the houseplant community and is pretty much known as the holy grail of all houseplants, Guess what—they’re easy to propagate, too!
How to Propagate It
Locate an area on the stem that has a few leaves (try for two or three), a few nodes, and an aerial root if possible. Make the cut below one of those nodes. Similar to the pothos, the monstera also has little brown nodes along the stems. Put the cuttings in a jar of tepid water making sure some of the nodes are under the surface.
Place the jar somewhere that receives bright, indirect light. Replace the water once a week or so, when it looks like it’s getting grimy, and top it off when the water level gets lower. Monsteras can be top heavy so you might have to use a taller jar or lean it against something to help it stay upright. It will be a few weeks before your cutting is ready to transfer to its pot, and having a cutting with an aerial root will help speed up the process.
Tradescantias
Tradescantias are awesome beginner houseplants. They’re fast growers and tend to get leggy, so you’ll probably end up needing to cut them back at some point anyway.
I recently started this Tradescantia Nanouk cutting:
How to Propagate It
Tradescantias are not finicky and will usually grow fine regardless of where on the stem they’re cut. Still, try to cut below a node on a stem that has a few leaves. Remove any lower leaves and place the cutting in a jar of tepid water so the nodes are below the surface.
Put the jar somewhere that receives bright, indirect light. After about a week you should see tiny roots sprouting. Replace the water once a week or so, when it looks like it’s getting grimy, and top it off when the water level gets lower. Within a few weeks, your cuttings should be ready to transfer into their pots.
As you can see, once you understand a few general guidelines it’s easy to propagate many plants because the process is similar. The key is patience. Don’t give up if your cutting isn’t ready to pot within a week. Slow and steady wins the race!
Leave a Reply